Using GOnnect
First start
There are a couple of ways to start the app:
-
Start menu/application launcher
-
GNOME desktop search (if configured, see desktop search configuration)
-
Following a
tel:orsip:link (if configured, see URL handler configuration) -
CLI:
flatpak run de.gonicus.gonnect
The app usually starts in background, unless showing the main window on startup is enabled (see settings). Note the GOnnect icon in the system tray menu. If you click on it and select you will see the main window, as described in the next section.
Overview
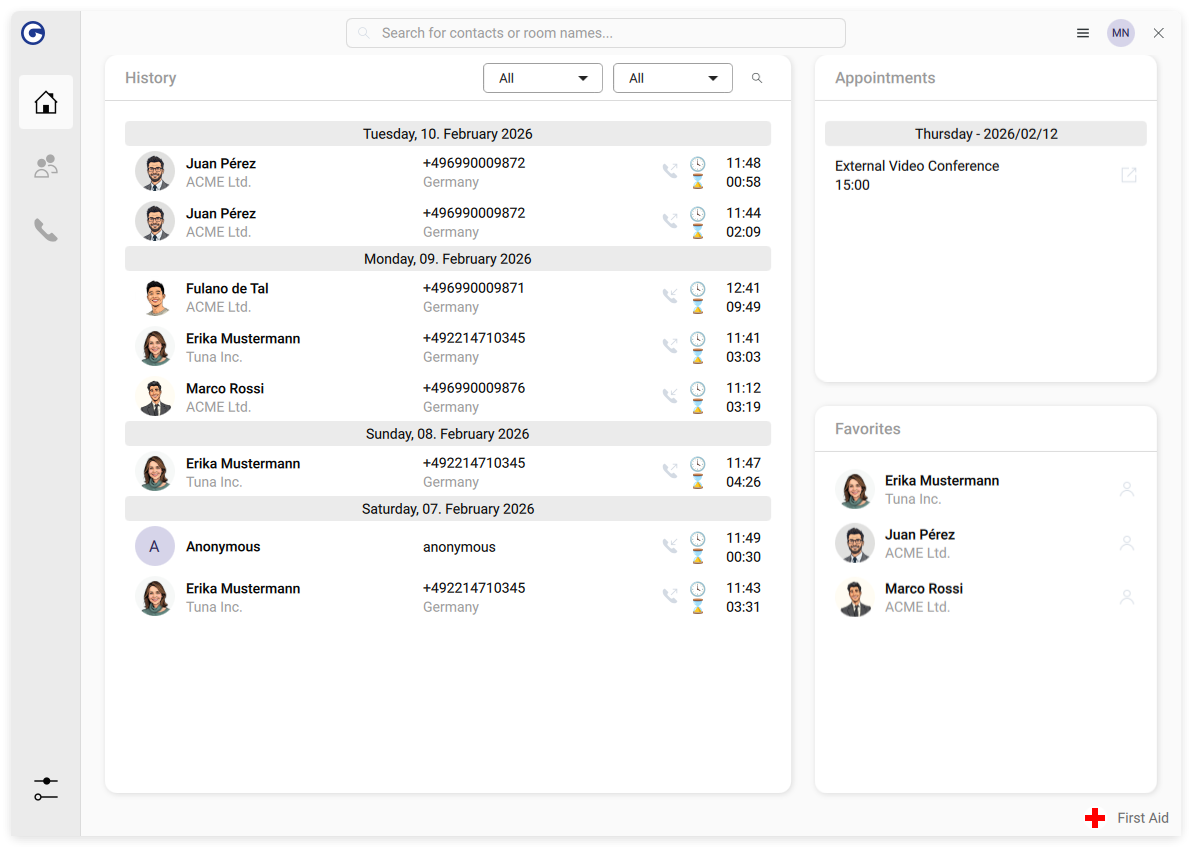
The main window has the following parts:
- The search and dial input box at the top
-
This is the main entry point to start a call, join a video conference or search for contacts.
- The vertical menubar on the left
-
Switch between the home screen, active calls or the settings screen.
- The center part
-
Shows the content of the selected topic of the vertical menu bar. The above image shows the default setting of the customizable widgets.
- Hamburger menu at the top right
-
Access some less common used items.
- First Aid menu at the bottom right
-
A configurable shortcut menu to access emergency information.
The search and dial input box
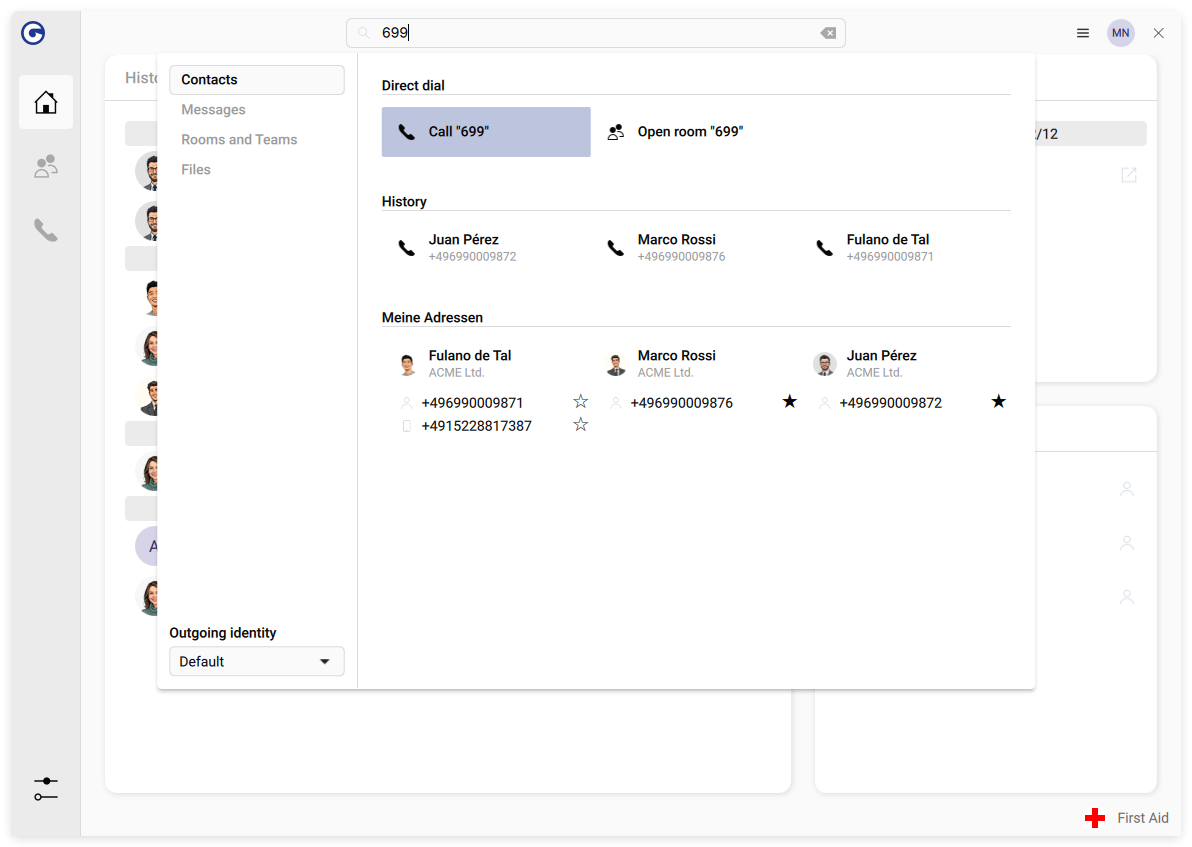
A central item of GOnnect is the search and dial input box on the top. Enter a phone number and select Call … to start a call, select Open room … to join a video conference or enter a name and pick one of the search result items that appear.
At the bottom left of the search results is a dropdown box for the outgoing identity. Please refer to the corresponding section to understand the concept and learn how to configure them. The box lets you choose one outgoing identity, which is used for the next call (and the next one only). To change the default value, please visit the settings page.
The vertical menu bar
The vertical menu has buttons to change the content, which is shown in the center part of the window.
 The home screen is the default view and is active on startup. The displayed widgets can be customized (see next section).
 The video conference screen is only selectable if you already have joined a video conference.
 The phone call screen is only selectable if there are active phone calls.
 The settings screen allows you to change the GOnnect settings.
The home screen and the customizable layout
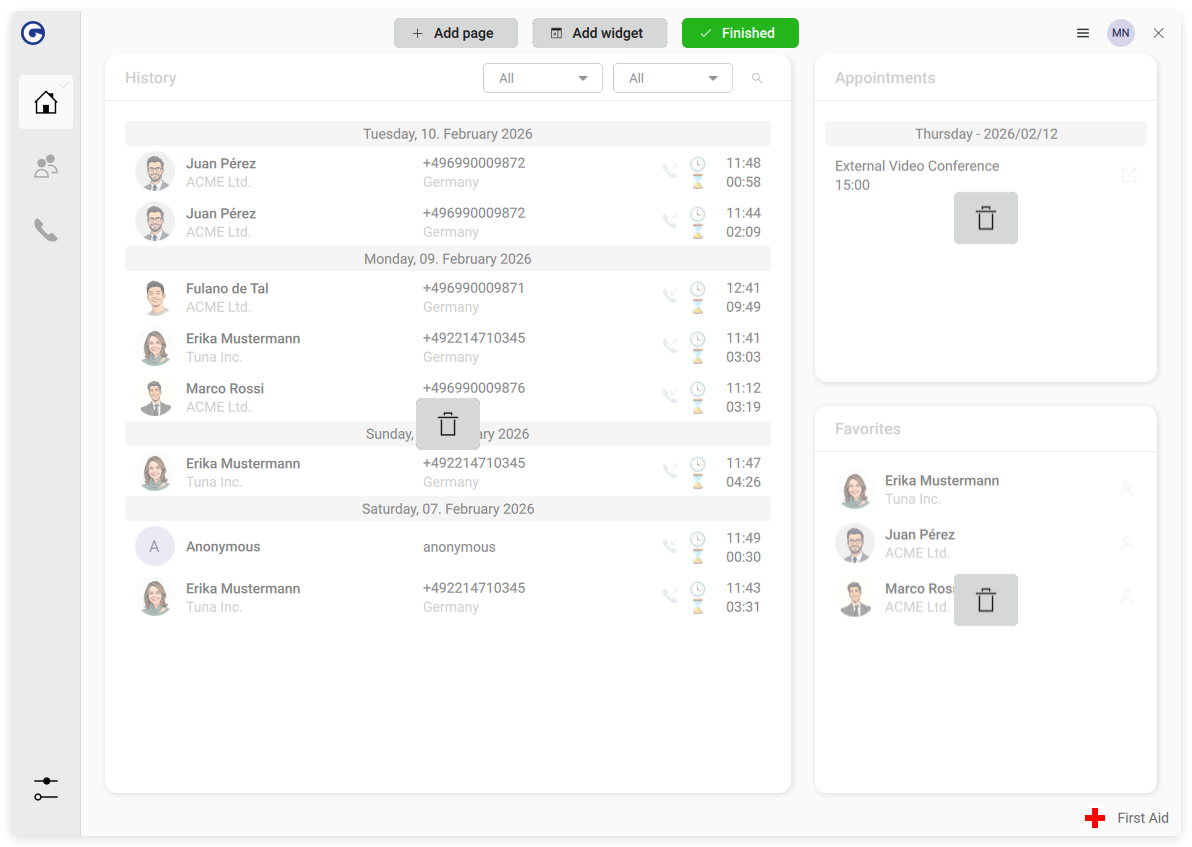
GOnnect provides a customizable layout. You can place and resize widgets as you like.
The default layout is shown here:
To customize the user interface choose the according entry in the hamburger menu at the top right.

In the following edit mode you can delete, add and resize widgets or add a page to the left vertical menu.
History widget
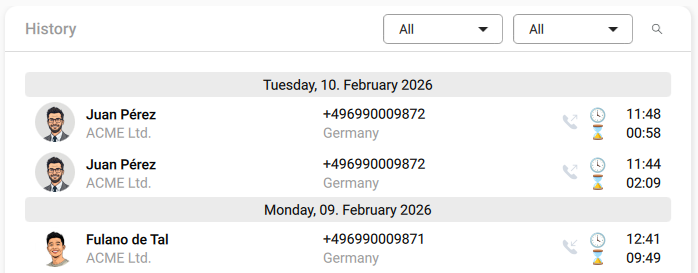
The history widget displays the latest entries of the call history. Double-click on a row to initiate a call to that contact or open the video conference room. Use the right mouse button for further options. This list will be empty the first time you start the app, but will then continue to fill.
Favorites widget
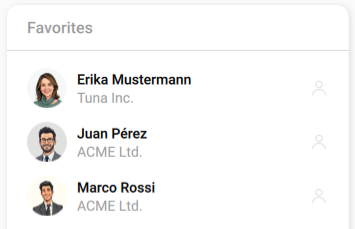
The favorites widget shows the list of favorites. Use a double-click to start a call or join the video conference and use the right mouse button for further options.
Date events widget
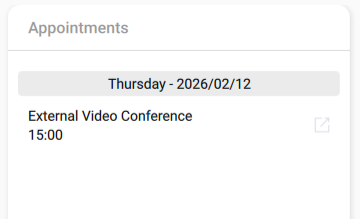
This widget shows a list of the upcoming appointments.
An entry may contain a group symbol, if the location of the appointment contains a link to the configured video conference solution. A double-click opens the room in the video conference tab.
If the appointment contains an URL as location, which does not correspondent to the configured video conference solution, a link symbol is shown. A double-click opens the link in your default browser.
The widget uses the Evolution Data Service, if present and additional CalDAV source can be configured also.
Calls
You have several options to initiate a call:
-
The search and dial input field in the main window
-
Double-click on an item in the history or favorites list
-
Right-click on the app icon or system tray icon (if available)
-
Using the GNOME desktop search (if configured)
-
Invoking a
tel:orsip:link, for example in the browser (if configured) -
Using the shell
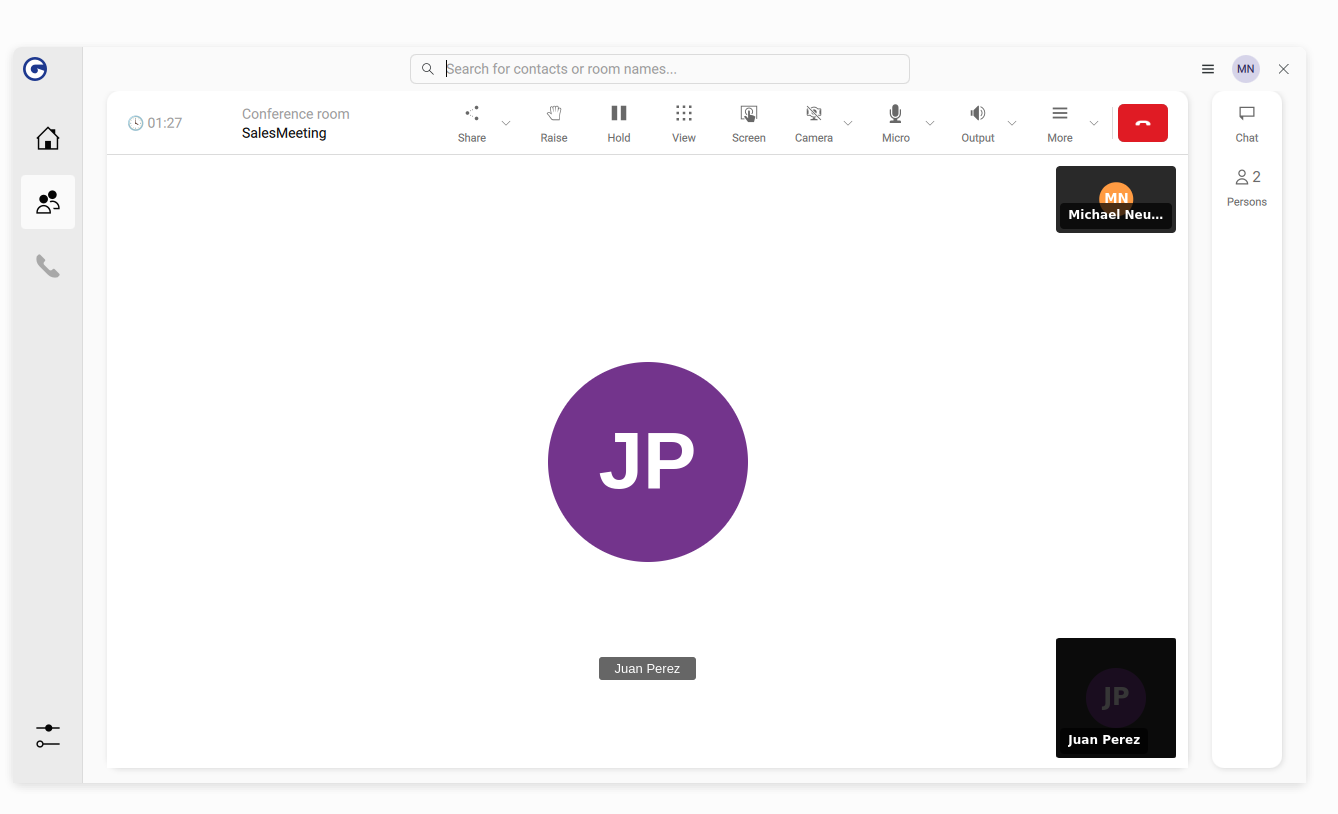
Active Call(s)
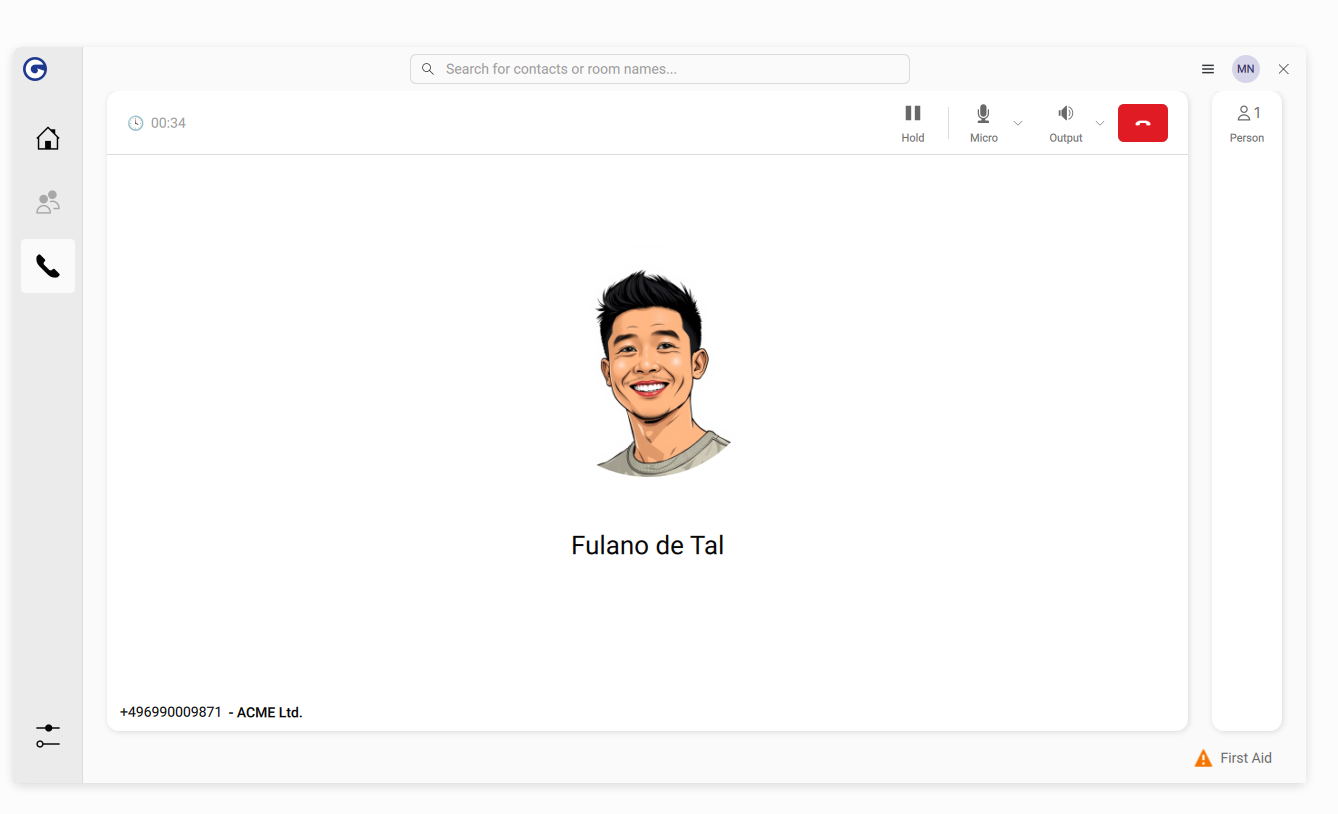
One or more active calls are shown in this call screen. You can switch between a detailed view of each call by selecting it in the right column labeled "Person(s)".
The center part of the window shows details and call-specific features, such as holding or finishing the call and adjusting audio levels.
DTMF (dial tones)
Acoustic dial tones might be needed when calling a hotline with an automatic response or entering the PIN when joining a conference call. When the call window is focused and the specific call is selected, simply press the number buttons on your keyboard to send the appropriate sound.
Incoming calls
When someone is calling you, a desktop notification will pop up, allowing you to accept or reject the call. Clicking on the notification itself will open the aforementioned call screen.
Multiple calls
GOnnect can handle several calls at the same time.
For example, when you have an active call, another call might come in. Depending on the settings for handling this (the client might just send "busy" and ignore it, if you have chosen this option), you can simply accept the new call like any other. Any existing calls will automatically be put on hold.
The same applies when you have an ongoing call and start a new one. The previous call will be put on hold automatically while starting the new one.
Once you have two (or more) active calls, you can end individual calls or choose one of the two options described in the next paragraphs.
With exactly two active calls, you can start an ad-hoc three-party conference with the visible button. Please be aware that the conference will be routed by the client that started it (the host). If the host has connection issues or ends the conference, it will affect the communication between the other participants as well.
The other option is call forwarding. In the right "Persons" column, simply drag and drop one list item onto the other. Those two people will now continue their call on their own.
Jitsi Meet upgrade
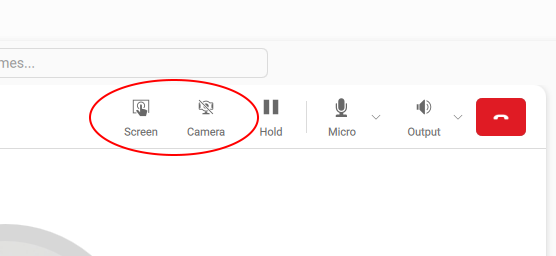
When all participants of a phone call use the GOnnect client and have that option enabled in the settings, a camera and screen button will appear in the call window to automatically upgrade the call to Jitsi Meet. The call is transferred seamlessly to a Jitsi conference, and the conference screen will be shown.
This is very useful if you decide to share your screen during an ongoing call or want to invite more people to the conversation.